Chapter 16 Track Issues Bugs & Features
16.1 Report a Bug via GitHub to Improve Modeling to Learn Resource
- Value Stream: Operations
- Workstream: facilitate_workflow, training_workflow, support_workflow
- Video: TBP
16.2 Create Issue/Feature cards [click maps in progress]
Click map would explain process here
16.3 Maintaining Cards [flow map in progress]
Flow map to maintain your issue/features cards as they get worked on.
We will wait for these flow maps until Branching MVP is tested: [Track a bug] might change [Track a feature] might change.
Previous Issue Card Flow Map:

16.5 Use GitHub Branches
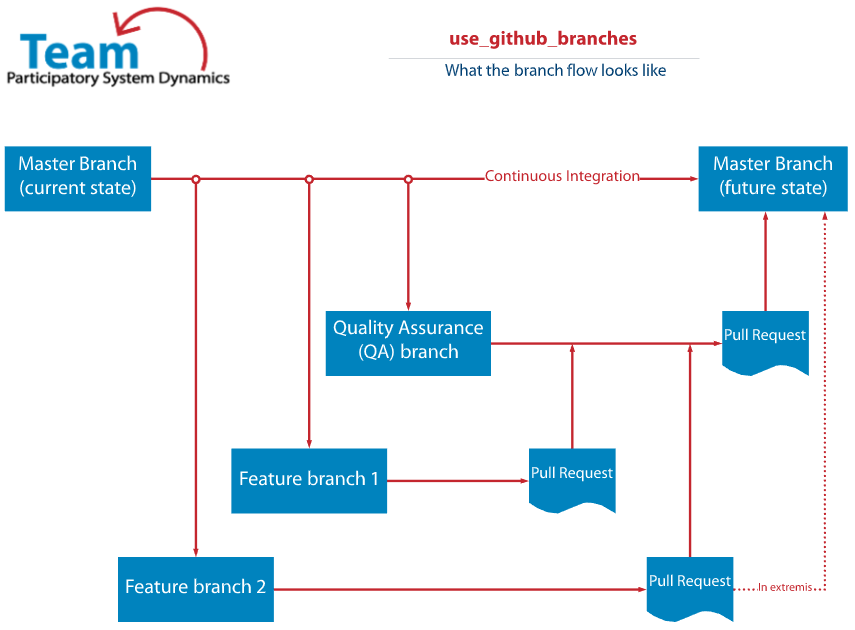
Use GitHub Branches Workflow
GitHub branches are used to provide continuous integration of multiple versions of a repository. Branches also control versions of a file and trigger automatic review and quality control actions to ensure files meet team standards. See Working with Branches for more information.
16.6 Submit a Feature
- No direct-to-master branch commits are allowed.
- A feature branch will merge with the Quality Assurance (QA) branch before being pushed to Master.
- The QA branch is a protected branch that requires mandatory reviews before changes can be merged with Master.
- In extremis and with approval, a feature branch may be directly pushed to the Master branch in circumstances where the QA branch is tied up with another feature branch.
16.6.1 Create a Feature Branch
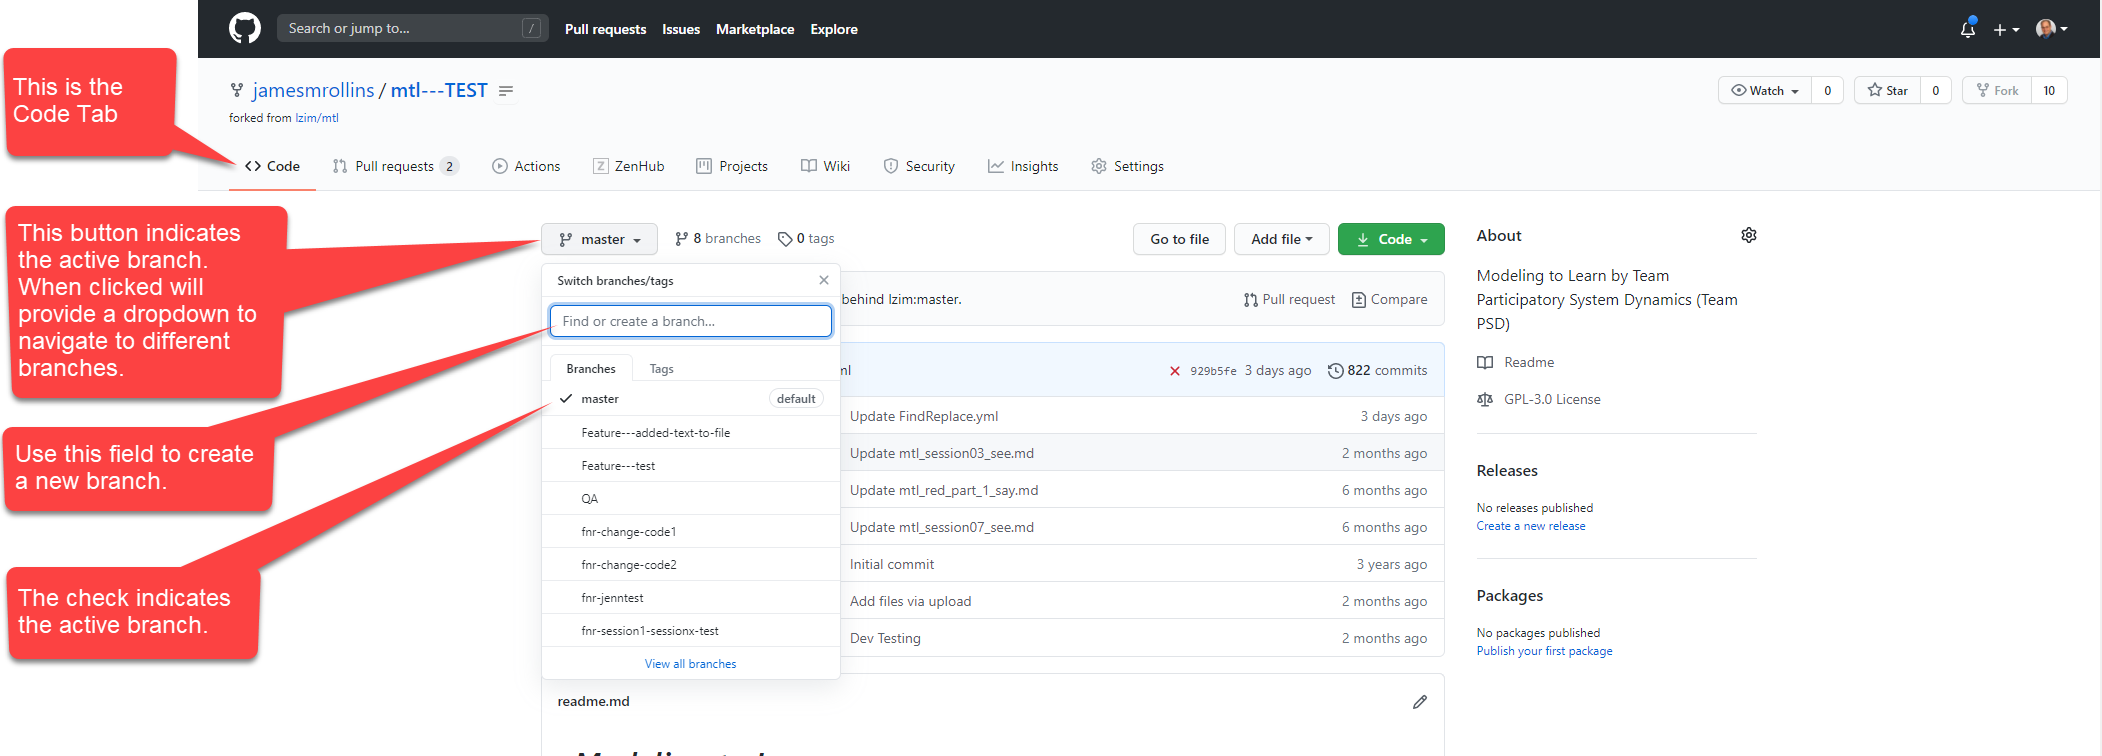
fig1_create_branch
- With the “<> Code” tab selected, click the button named “master” in the upper left of the directory.
- A dropdown will appear with a listing of all branches currently active in the repository. A check indicates the branch that is active.
- In the “Find or create a branch . . . “ field, enter the name of your branch using this format: “feature-my_new_branch” The word “feature” will trigger automatic workflows when you commit the branch. Use lowercase letters and an underscore “_” between words. After the word “feature” provide up to a 4-word short description of what the feature addresses.
- When the “Commit” button is clicked, the word “feature” will trigger automatic quality control actions. The results of these actions can be reviewed in the actions tab of GitHub.
16.6.2 Edit a Feature Branch
- To edit a feature branch, navigate to the “<> Code” tab and click the button named “master” in the upper left of the directory.
- A dropdown will appear with a listing of all branches in the repository.
- Click on the desired feature branch in the list.
- Navigate to the target file from the directory.
- Edit the target file within this branch.
- When edit is complete, commit the file back to this feature branch.
- The commit will trigger quality control actions that can be reviewed in the actions tab.
16.6.3 Push a Feature Branch
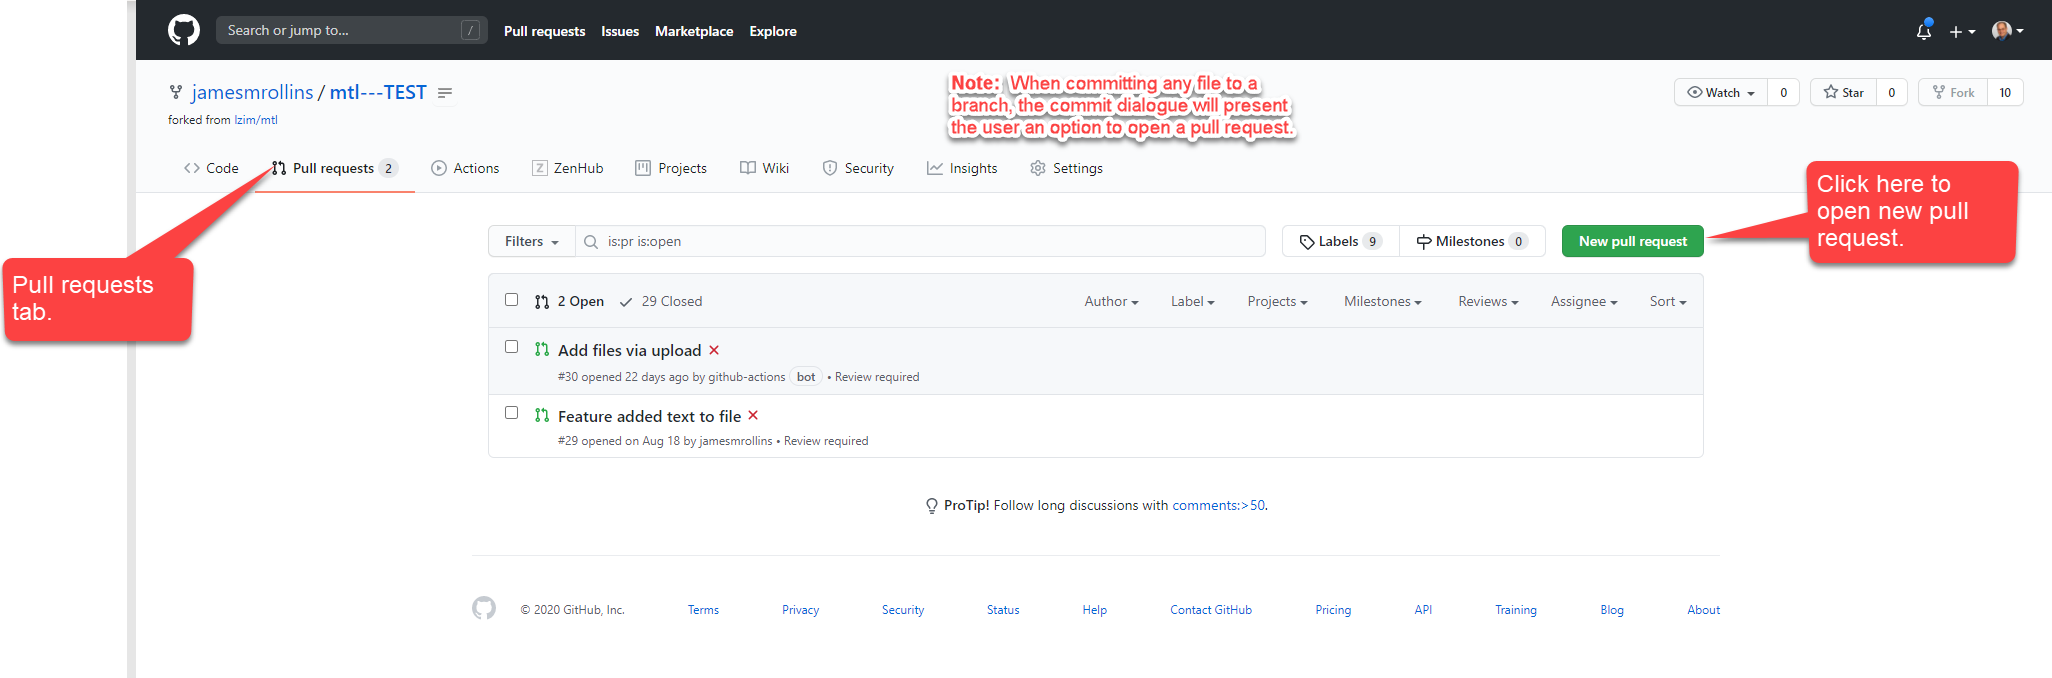
fig2_new_pull_req
- To push an updated file or files from a feature branch to the QA branch, the user must open a Pull Request. Note: Opening a pull request can be done when a file is committed to a branch using the commit dialogue, or the user can navigate to the “Pull requests” tab.
- Navigate to the “Pull requests” tab.
- Click the green “New pull request” button on the right-hand side of the page.
- Review the “Comparing changes” dialogue very carefully (see image below).
- Ensure the base branch indicates “QA.” If it does not, click on the button and select correct branch.
- Ensure the pushed branch is the desired feature branch.
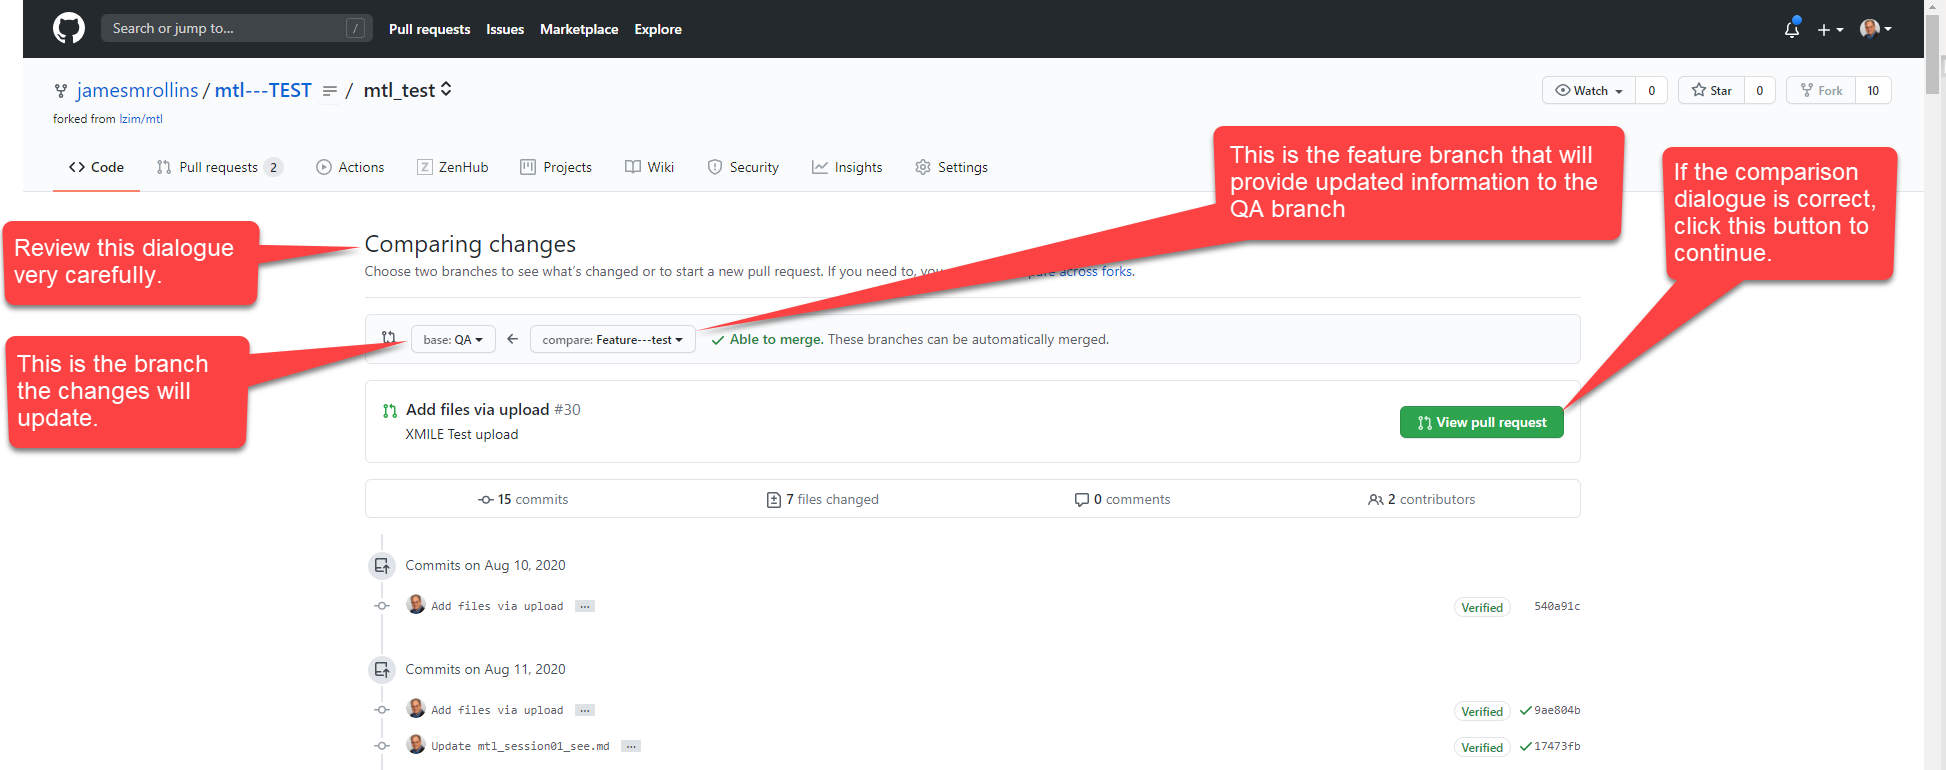
fig3_compare_changes
16.7 Run Quality Assurance

fig4_rerun_quality assurance
- The QA branch is a protected branch, which means it cannot complete the merge unless all conflicts and errors are cleared and the assigned reviewers have signed off on the changes.
- When a feature branch is pushed to the QA branch, quality assurance actions will automatically run and list out any findings under the Actions tab.
- The user checks for errors in this tab, and corrects any findings.
- The user can re-run the quality checks from the actions tab by clicking the “Rerun jobs” button on right hand side of screen (see figure above).
16.8 Use a “Find and Replace” Branch
GitHub FNR feature branch is a specialty branch that is used to find desired words or short strings and replace them automatically throughout documents in the repository. The FNR action can be limited to a file, a director or the whole repository by modifying instructions in the FindReplace.yml file found in the .github/workflows directory.
16.8.1 Configure the FindReplace.yml Action File
Below is an explanation on how to configure the find and replace function.
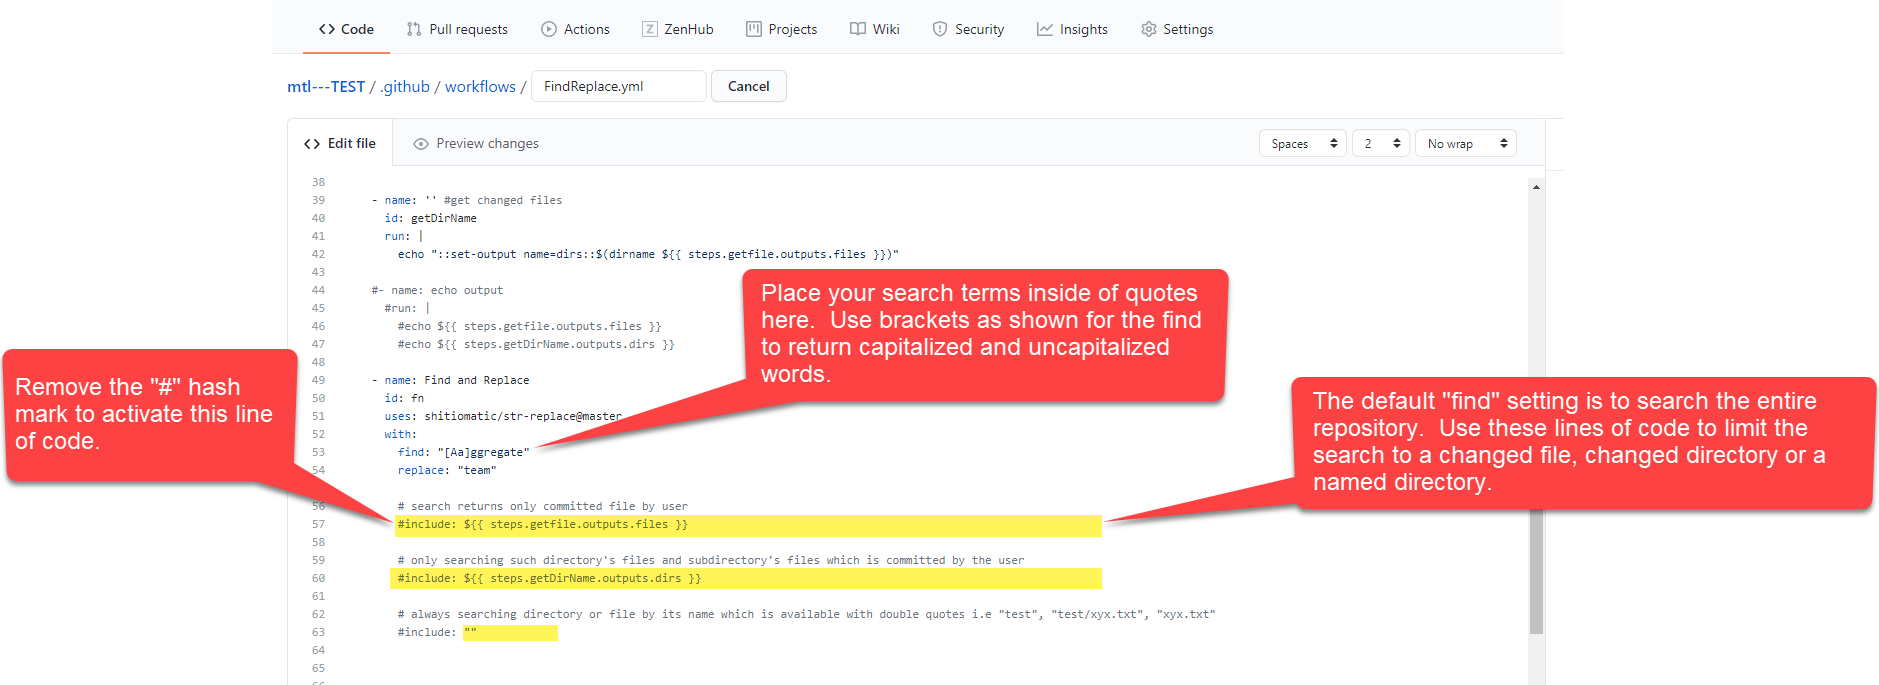
Configure the FindReplace.yml Action File
- Select the FindReplace.yml file and place in “edit” mode.
- Update line 53 with the desired word, acronym or string within in the quotation marks. PRO TIP: Do not leave extra spaces before or after words, unless you want the search to include the space immediately before or after a search string. For example, the search term “Session 1” will find “Session 1”, “Session 10” and all instances where the number “1” is found, even if it is in the number “10.” To limit the search, place a space immediately after the “1” like this “Session 1” and that will limit the search to “1” only.
- Update line 54 with the replacement term in quotation marks.
- To limit a search to an updated file or directory, remove the appropriate hash mark (#) from the line of code that provides the needed search constraint.
- Navigate to the upper left of the window and select the green “Start commit” button. Select the “Commit directly to Master branch” radio button and click the green “Commit changes” button.
16.8.2 Create a “Find and Replace” (FNR) Branch
- Navigate to the code tab.
- Click on the branch button and expose the branch dropdown menu.
- In the “Find or create branch” field, enter the name of your find and replace branch using this convention: fnr-findterm_replaceterm. For example, if “session 1” was the find term, and “Session X” was the replace term, it should read “fnr-session_1_session_x.”
- Press enter and navigate to the “Actions” tab. Here the action will report how many terms were found and replaced (see images below). For a line-by-line review of changes, open a pull request.
Open action tab and review action status

Open pull request comparing FNR branch to master

Compare changes

16.9 Update a Bookdown File Using the “gh-pages” Branch
To support the publication of a bookdown manual, a special branch is required named “gh-pages” branch. This branch contains the markdown files that are editable and are automatically compiled by an bookdown publication action, when a feature branch is merged with the gh-pages branch. Follow the steps below to edit a bookdown manual.
- Navigate to the “gh-pages” branch.
- In the “Find or create a branch” field, enter a feature branch using the following convention: feature-gh-pages_chapter_action. For example, an update to chapter 9 might look like this, “feature-gh-pages-ch9_update” This will clue reviewers that the action will merge with gh-pages after review.
- Navigate to the "feature-gh-pages_*"
- Edit the desired file.
- Commit the file to the same branch.
- Open a pull request to merge with the gh-pages branch. This will trigger the spell checker, link checker and markdown style checkers and signal reviewers that a check is needed.
- Navigate to the Actions tab to resolve any issues found by the linters.
- After review, the reviewer will merge the branches. This will trigger the bookdown publishing action to publish the updated manual.
16.10 Update a Model File Using the Dev, Test and Master Branches
Please note: Vensim cannot run in actions associated with web-based GitHub. All edits and file conversions must be run on a client machine with associated license. Batch files can be run to save time, but these outputs must be produced on a licensed client and pushed to origin via a client git such as GitHub desktop.
If a user desires to update a model, they must push the update in three versions, .mdl (Vensim readable format), .vmfx (Vensim binary) and .xmile (SD standard) to the DEV branch (see figure below). The push will trigger an action that will deploy the model files to their respective locations. As the model moves through development and test, the associated model files will deploy incrementally to associated Epicenter projects (i.e., Dev branch merges with the Test branch, files deploy to Epicenter test project; when the Test branch merges with Master branch, files deploy to Epicenter PROD projects). Upon merge with the Test or Master branch, the action will create a standardized .html System Dynamics Document file and deploy the file to the lzim/mtl/blue/mtl2.0_models folder.
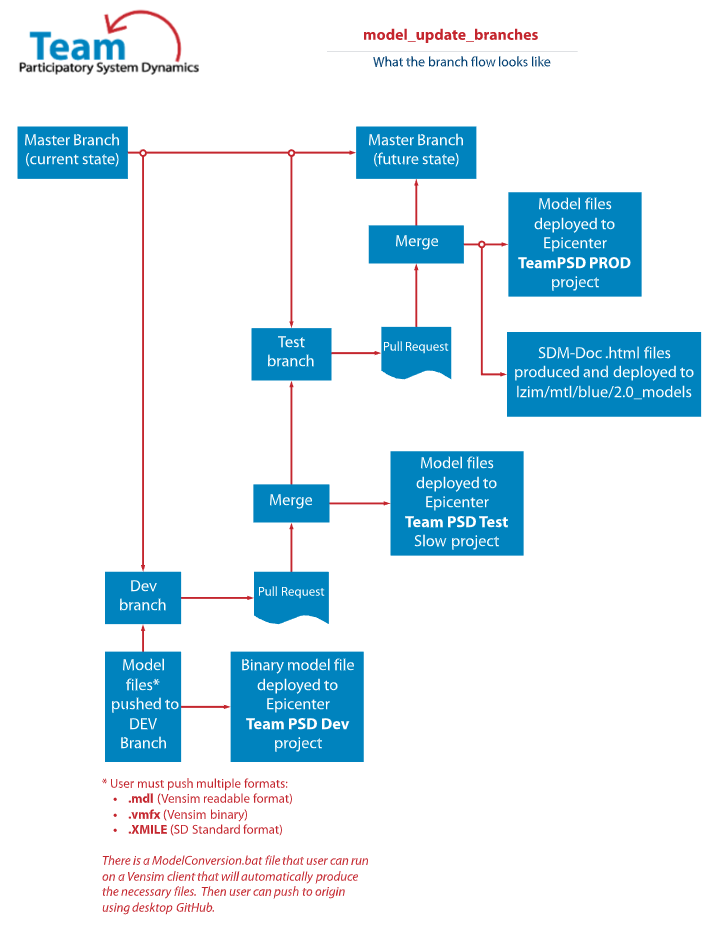
model update branch process image
- Navigate to the lzim/mtl Dev branch. Ensure the branch is up-to-date with the Master branch. If not, merge Master to Dev to bring it up to date.
- From the Dev branch, update the desired .mdl model file. This can be done on a client by modifying the cloned file on a client using a licensed copy of Vensim (recommend Vensim version 8.4).
- When development is complete, save .mdl, .vmfx and .xmile versions of the file.
- Push modified files to origin and note changes in comments field.
- When development activities are concluded, open a pull request to merge Dev with Test. Fix any errors and merge the two branches.
- Upon merge to Test, the files will be deployed to the Forio Epicenter VA Sim UI Test Slow project.
- Conduct user-acceptance testing.
- When user acceptance testing is completed, open a pull request to merge Test with Master branch.
- When reviewer have signed off, merge the Test branch to Master branch.
- When Test is merged with Master, the action will deploy .vmfx file to Forio Epicenter VA Sim UI PROD project. The action will also execute the SD-DOC program and create an SD-DOC .html file and deploy to the lzim/mtl/blue/mtl2.0_model folder.
16.11 Contribute to an R Notebook
Figure 1: Workflow for Quant group rnotebook contribution
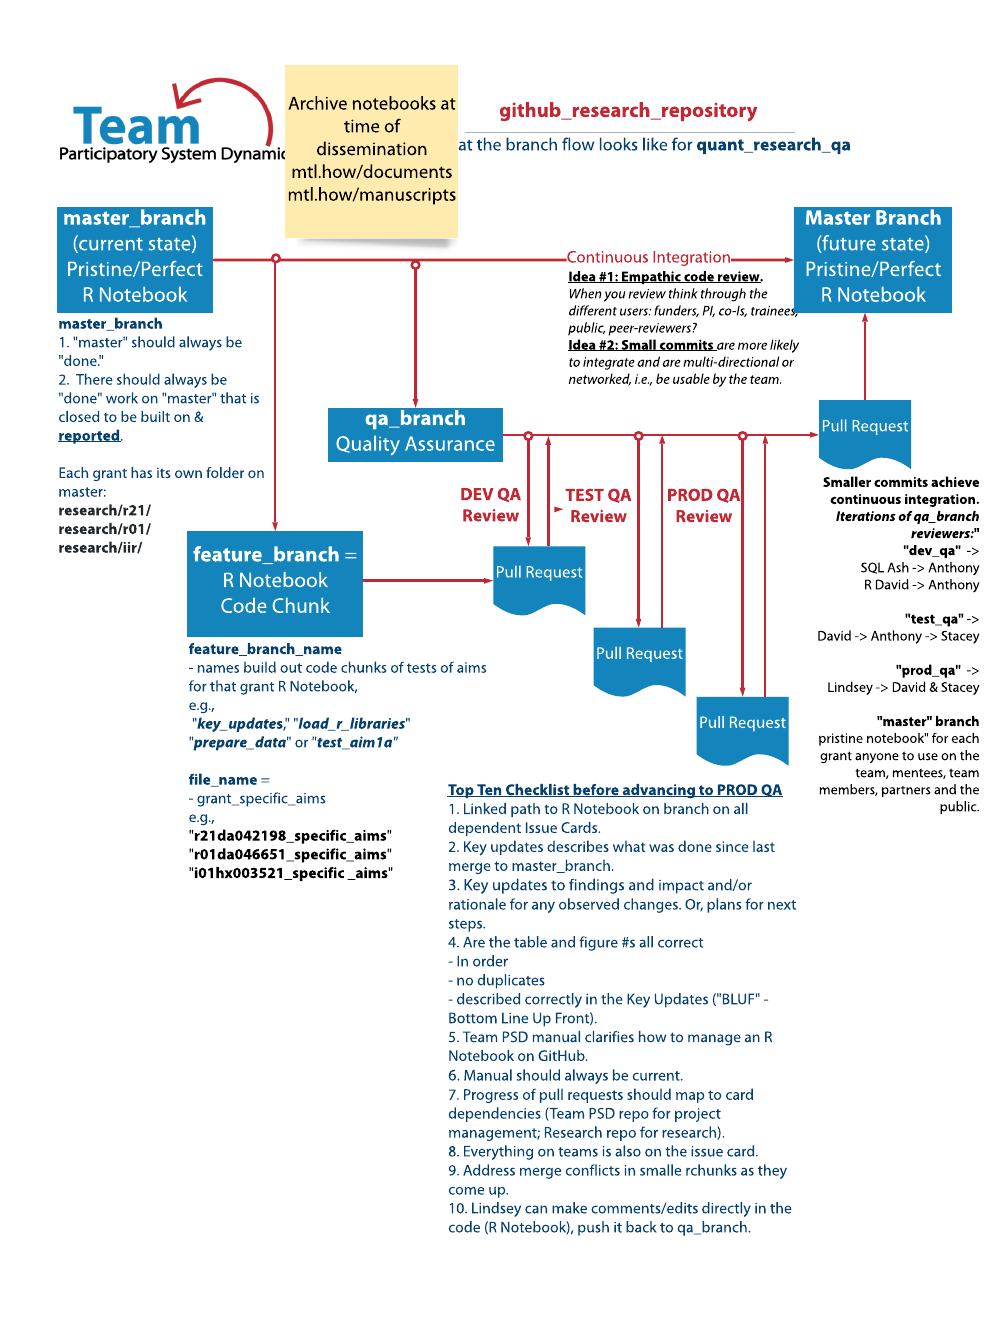
quant_wg_qa_workflow.png
Step 1: Under Current Repository select research. click current branch then select New Branch

github_desktop_select_repo.gif
Step 2: Title your branch appropriately. Precede your branch name with grant name (e.g r21_load_r_libraries) and select Master as the base branch.

quant_workflow_title_branch.gif
Step 3: On the menu bar, click on the Repository and select Show in Finder (Mac) or Show in Folder (PC) click on the project folder and then R project file.

github_desktop_show_in_folder.gif
Step 4: To edit/add an existing code chunk, navigate to the chunk and make appropriated edits (Remember to include documentation).

github_edit_code_chunk.gif
Step 5: Save your work and go back to Github Desktop. Click fetch origin and commit your changes. Remember to add a title and description of your commit. A good commit title would include name of code chunk edited/added, section title of the notebook or task name (e.g edit titles, added references,… ).

github_desktop_commit_changes.gif
Step 6: Click Push to Origin then Create Pull Request. This will send you back to Github.

github_desktop_create_pull_request.gif
Step 7: Follow the steps outlined in Submit a Feature to submit your changes for review
16.12 Reviewing pull requests
While reviewing the files in a pull request, you can leave individual comments on specific changes. After you finish reviewing each file, you can mark the file as viewed. This collapses the file, helping you identify the files you still need to review. A progress bar in the pull request header shows the number of files you’ve viewed. After reviewing the files you want, you will approve the pull request or request additional changes by submitting your review with a summary comment.
16.12.1 Starting a review
- Click Start a review. If you have already started a review, you can simply click Add review comment.

Before you submit your review, your line comments are pending and only visible to you. You can edit pending comments anytime before you submit your review. To cancel a pending review, including all of its pending comments, scroll down to the end of the timeline on the Conversation tab, then click Cancel review.

Cancel review button
16.12.2 Marking a file as viewed
After you finish reviewing a file, you can mark the file as viewed, and the file will collapse. If the file changes after you view the file, it will be unmarked as viewed.
- On the right of the header of the file you’ve finished reviewing, select Viewed.

16.12.3 Submitting your review
After you’ve finished reviewing all the files you want in the pull request, submit your review.
- Select the type of review you’d like to leave:

- Select Comment to leave general feedback without explicitly approving the changes or requesting additional changes.
- Select Approve to submit your feedback and approve merging the changes proposed in the pull request.
- Select Request changes to submit feedback that must be addressed before the pull request can be merged.