Chapter 7 DataOps Workstreams
7.1 Specific Workflows
- support_workflow: This coordinated workflow of both quant_workflow and sim_ui_workflow is in support of development and operations value streams. Coordinated by DataOps.
- sim_ui_workflow: This workflow provides design, maintenance, and operational support of the MTL Simulation User Interface (Sim UI) in support of development and operations. Coordinated by DataOps.
- msd365_workflow: Supports the operations and development value streams. Coordinated by DataOps.
7.2 Manage DataOps Workstream Permissions
- Value Stream:
- Workstream:
- Workflow:
- Reference: Check the Research Repo. (Navigate to data_ui and check the New Programmer Guide.)
GitHub research repo
- Sign in using lzim GitHub login details in TeamPSD Shared Drive > Vendors.
- Ping Lindsey to approve two-factor login.
- Go to the Settings tab > Access in the GitHub teampsd repo.
- Sign in and add user’s GitHub username under “Contributors”.
Get National Data Access to CDW, required to view data in the data UI.
DART
- Go to DART Dashboard.
- Click on User Guide and read all chapters for orientation on how to request, submit, and manage a DART request.
- Follow instructions on Participants in Chapter 4 on how to add members and prerequisites.
VINCI
Content needed.
SSIS
Content needed.
Power BI Premium App Workspace
(MTL Data UI & Team PSD 3.0) 1. Install Power BI Desktop onto your laptop from the Software Center. 2. Request a Pro Power BI License first to request a premium app workspace. 3. Follow BISL’s Power BI documentation on what premium workspaces are and how to request them at SharePoint. 4. Navigate to Power BI after BISL sets up your premium workspace. 5. Click on the workspace icon in the bottom left-hand corner (looks like a stacked deck of cards).
- All Team PSD members should have access to the following premium workspaces:
- PTSD_OMHO [Dev]
- PTSD_OMHO [Test]
- PTSD_OMHO [Prod]
- TeamPSD 3.0 Data Pipeline [Dev]
- TeamPSD 3.0 Data Pipeline [Test]
- TeamPSD 3.0 Data Pipeline [Prod]
- If you do not have access to these workspaces, follow these steps:
- Click into the premium workspace (has a diamond icon).
- In the premium workspace, click on the “Access” tab in the top header.
- Add the emails of Admins into the workspace.
Individual Pro Power BI Licenses
- Members who are DEVeloping, QA’ing, and PROD’ing on PowerBI will need a Pro Power BI License.
- You know you have a Pro License by going to Power BI and clicking on your icon in the upper right to view your license type.
- Follow BISL’s Power BI documentation on what Pro Licenses are and how to request them at SharePoint.
Power BI Workspace Deployment Pipelines
- Deployment pipelines are used to automate deploying fixes and features from Dev > Test > Prod.
- Follow BISL’s Power BI documentation on more info on deployment pipeline and how to request them at SharePoint.
PTSD_OMHO Gateway Access on Power BI
- Open a LEAF request.
- Select “PBI Add Access to Data Source Gateway” and fill out information including the server and the data set.
- A gateway access is per-user and allows users to connect their published Power BI instances to the PTSD_OMHO workgroup.
- See 7.12, Report Data UI and Power BI Use Data, for more details.
- This can be approved without PI approval.
- Sign in with your own Epicenter account.
- Scroll down and click on the “Veterans Affairs (13)” project.
- Click on “Members” in the left-hand navigation.
- Click on “Add Member” to add the email of the member and assign the “Author” role.
Note: Author role gives the ability to delete all of our projects/websites hosted on Forio (mtl.how/team, mtl.how/demo, mtl.how/sim, mtl.how/menu), be extremely cautious in this platform.
7.3 Achieve Development Value Stream Key Performance Indicators (KPI)
- Cumulative Flow. See Reading Cumulative Flow Diagrams.
- Control Chart. See Use Control Charts to Review Issue Cycle/Lead Time.
- Burndown Report. See Track Sprint Progress with Burndown Charts.
- Velocity Tracking. See Track Team Velocity Sprint-over-Sprint.
7.5 Sync Bug Tracker Progress to Squash Team PSD and Research Bugs
- In lzim/teampsd or lzim/research, open a new issue and select BUG template.
- Complete filling out the issue template. Provide a screenshot of the problem if possible.
- Save the issue. When saved, it will automatically go to Triage Kanban in the respective Bug Tracker.
- Triage bug and determine if the information is complete. If there is a question, discuss at the Workstream Leads meeting.
- Estimate the story points needed to resolve and select the resolution path (Breakfix or normal).
- When bug is being fixed, move card to In Progress swimlane. When complete, move to Review/QA swimlane.
- After successful review, close the issue.
7.6 Sync Feature Tracker Progress to Develop Team PSD and Research Features
- Value Streams: Research, Development, Operations
- Workstreams: All
- Workflows: All
- Video - This training video provides and example of how to request a new feature, including how to think through several cross-cutting dependencies. Here is the example feature covered in the video to change the password creation process for the MTL Menu for MTL 3.0: #2699.
- Reference: mtl.how/features
- Reference: mtl.how/research_features
Request a New Feature
Navigate to one of the two feature trackers:
- Research: https://mtl.how/research_features
- Development or Operations: https://mtl.how/features
All feature requests begin in the needs_triage.
Click on Issues at the top navigation bar.
Click on the green New Issue button.
Select Feature. This GitHub issue template shows what kind of information is needed for a Feature.
Delete that information and replace it with the information for your Feature.
On the right panel, click Projects, then select research_feature_tracker or feature_tracker.
When done, click the green Submit new issue icon. Workstream and Workflow Leads will scope the requirements for the new Feature.
7.7 Coordinate a Code Review
7.7.1 How to access R notebooks
Each grant has a folder on our repo. Within these folders, you will find R notebooks for various analyses or manuscript relevant to that grant.
### How to Run Notebooks
Across all notebooks, code chunks that rely on data sources located behind the VA firewall will only run on a your VA machines based on your access credentials. Email mtl.info@va.gov to request permission to access data provisioned to TeamPSD that you do not have access to. Code chunks that depends only on data available in our GitHub repositories can be executed on non-VA machines. Detailed instructions on how to establish connections and load data are provided in the respective notebooks.
7.8 Update an R Notebook
R Notebooks enlist 2 API Tokens
- Use Lindsey’s GitHub lzim/research account for an API token (Team PSD folder > Vendors).
- Request a REDCap API token (IRB approval & VA REDCap approval is required first; the token will expire after 90 days).
- Install R, R Studio, & GitHub desktop on your VA GFE by opening a yourIT Help Center ticket.
7.10 Refresh Data for R01 or IIR
- Value Streams: Research, Development
- Workstream: DataOps
- Workflow: for refreshing data for our R01 and IIR trial
7.11 Update a Vensim Model
- Model variable changes
- i Information update
- Update models in client github clone lzim/mtl DEV branch.
- Save .mdl and .vmfx model formats and save to DEV branch.
- Merge GitHub Client DEV with GitHub web DEV.
- Test model function in Epicenter MTL DEV project.
- If pass, merge DEV branch to TEST branch.
- Test as required.
- If pass, then promote TEST to MAIN branch.
7.12 Update Sim UI Module Documentation
- More Information.
- Tutor.
- MTL Demo Website.
- Team PSD Website.
7.13 Update the Power BI Data UI Instances (w/example)
- Value Stream: Development, Operations
- Workstreams: DataOps
- Workflow: support_workflow, quant_workflow
- Video
- Request a Pro License to use Power BI instances.
- Install Power BI Desktop App (if not already on your VA GFE laptop).
- Request a Premium Capacity Workspace.
- If a new premium workspace is required, navigate to LEAF to request a Power BI Premium Workspace.
- Navigate to Power BI website.
- Existing TeamPSD members can grant access to Team PSD premium workspaces and specify their role groups/user type (e.g., Admin).
- Once within the workspace (instance), click on Access to add new users.
- Once within the Access page, enter user email (for the team member you want to add), and set their role to ADMIN, and click Add.
- Navigate to the shared PTSD_OMHO workspaces (DEV, TEST, PROD instances)
- Tips & Tricks: Access to premium workspaces is granted in real-time. If you do not see them yet, then refresh your browser.
- Navigate to the Deployment Pipeline icon on the left-hand navigation menu (rocket icon).
- Navigate to PTSD_OHMHO Pipeline, click Acccess, and add user email and set role to ADMIN.
- Add users to grant Access (i.e., Admin access).
- Note: Toggle “On/Off” must be “Off” to add new Users. Toggle “On” to add/update workspace permissions.
- Review the data pipeline (DEV, TEST, PROD).
- Select the Modeling to Learn Data UI Landing page (https://mtl.how/data).
- Request Gateway Access to the PTSD_OMHO Workspace.
- Take over ownership of any reports in Production that you will be overwriting.
7.14 Report Data UI and Power BI Use Data (w/example)
- Value Streams: Research, Development, Operations
- Workstream: DataOps
- Workflows: support_workflow, quant_workflow
- Navigate to the Power BI app home page.
- Click on the Workspaces icon in the left-hand navigation panel.
- From the Team PSD Power BI instances, select PTSD_OMHO [Production].
- Find the VISN report for the Modeling to Learn site.
- Select the Blue Report icon, NOT the Orange Dataset icon.
- Hover over the 3 dots […] for the selected report.
- Click View usage metrics report.
- Power BI will indicate the report is loading.
- View Usage Metrics for the VISN.
- Collect data on MTL team members’ use in the User Panel.
- Example: IIR Wave 1, TEST, VISN 6 - Durham, MTL Red
- Report usage
- Report performance
- Report list
- Pin to dashboard
- Example: IIR Wave 1, TEST, VISN 6 - Durham, MTL Red
7.16 Schedule Daily Data UI Refresh
Note: After you have taken over ownership of a dataset in production or have pushed a change to production, make sure the data refreshes are still scheduled daily for each dataset in the deployment pipeline.
- Go to the Production workspace.
- Go to settings for the dataset you want to schedule a refresh for.
- Under Settings for Data, click the arrow next to Gateway connection. This will turn the Schedule refresh from gray to a black clickable option. Select Schedule refresh once it becomes clickable.
- Under Schedule refresh, select the ‘on’ toggle, then request a daily refresh frequency for a time between 1-4 a.m.
- Select both the Dataset owner and mtl.help@va.gov for ‘send refresh failure notifications to’.
7.17 Create a Test Release Branch for a lzim/teampsd New Version Release
When MTL goes from one version to a higher version, documentation, models and other materials contained in the lzim/teampsd repository must be tested. To prevent mixing up test version materials with materials in use, a test branch must be created. The branch also moves current versions of materials to an archive folder and the new models must be moved into the next version folder. All of these actions are automated with the make_test_release_branch.yml action. The sections below explain how to set up the action yaml file.
7.17.1 test_release_branch Creation Procedure
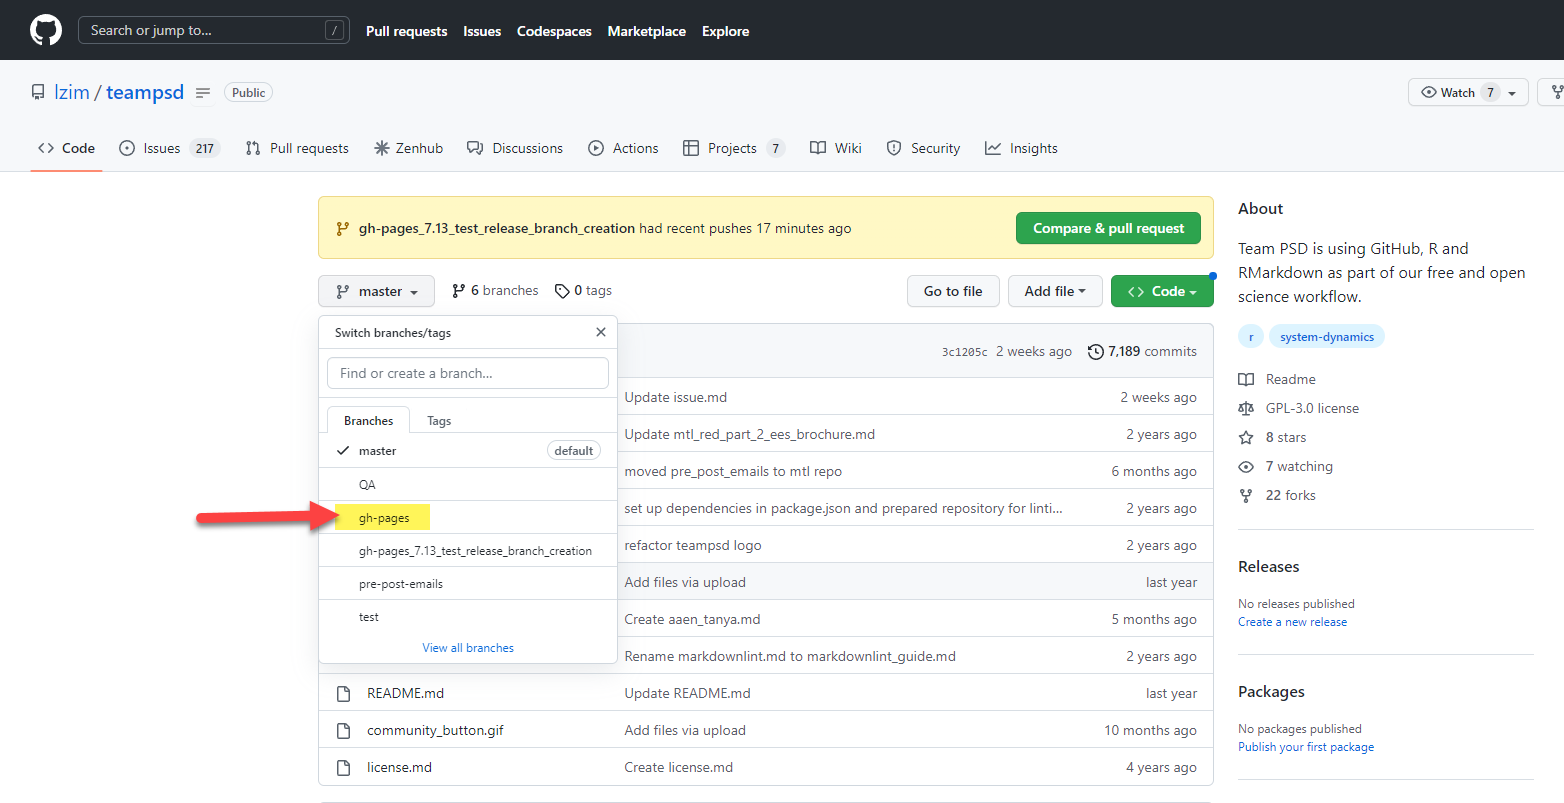
- Navigate to gh-pages branch
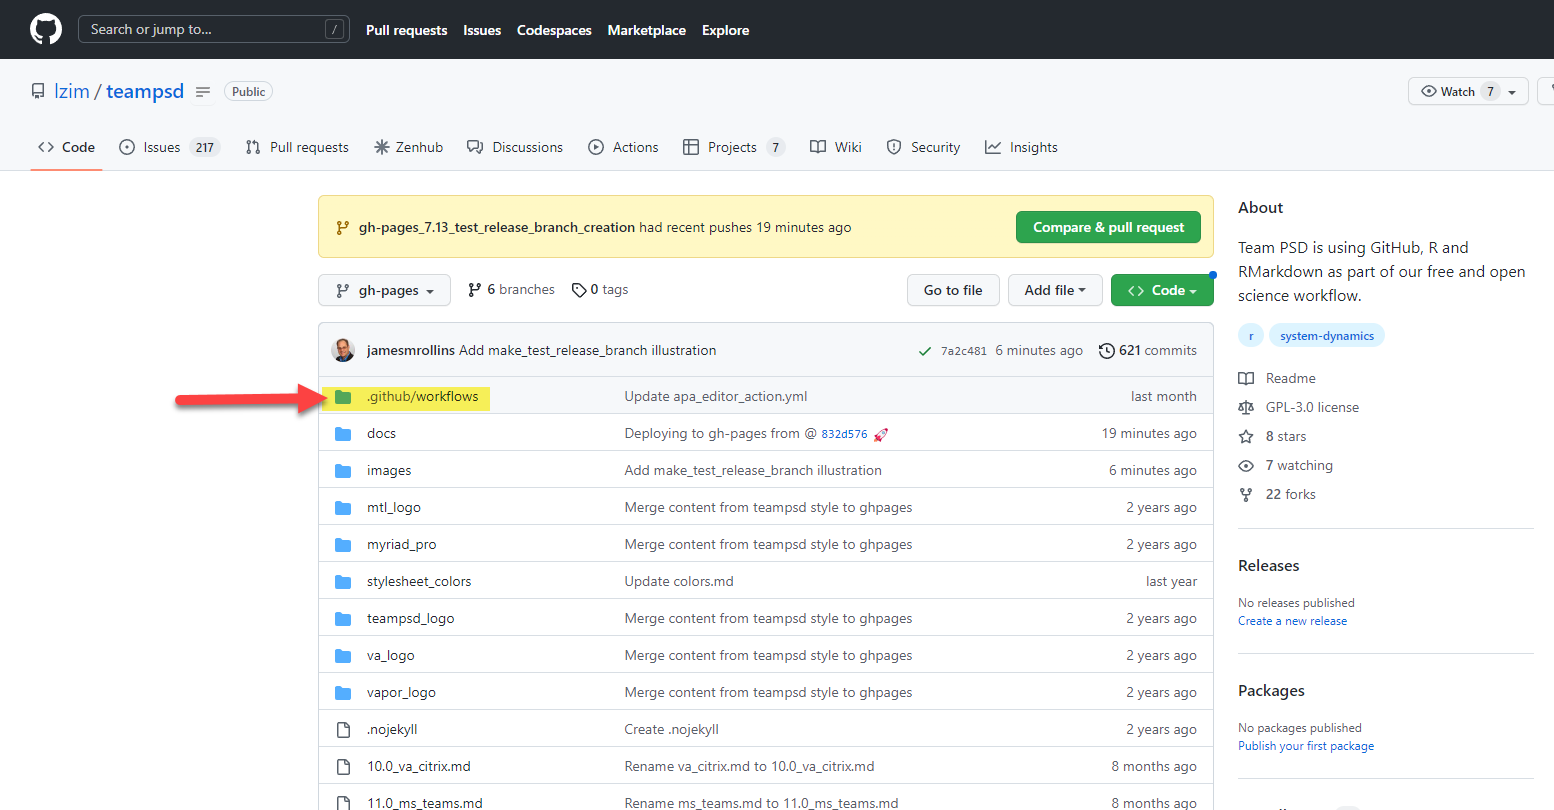
- Navigate to the .github/workflows folder
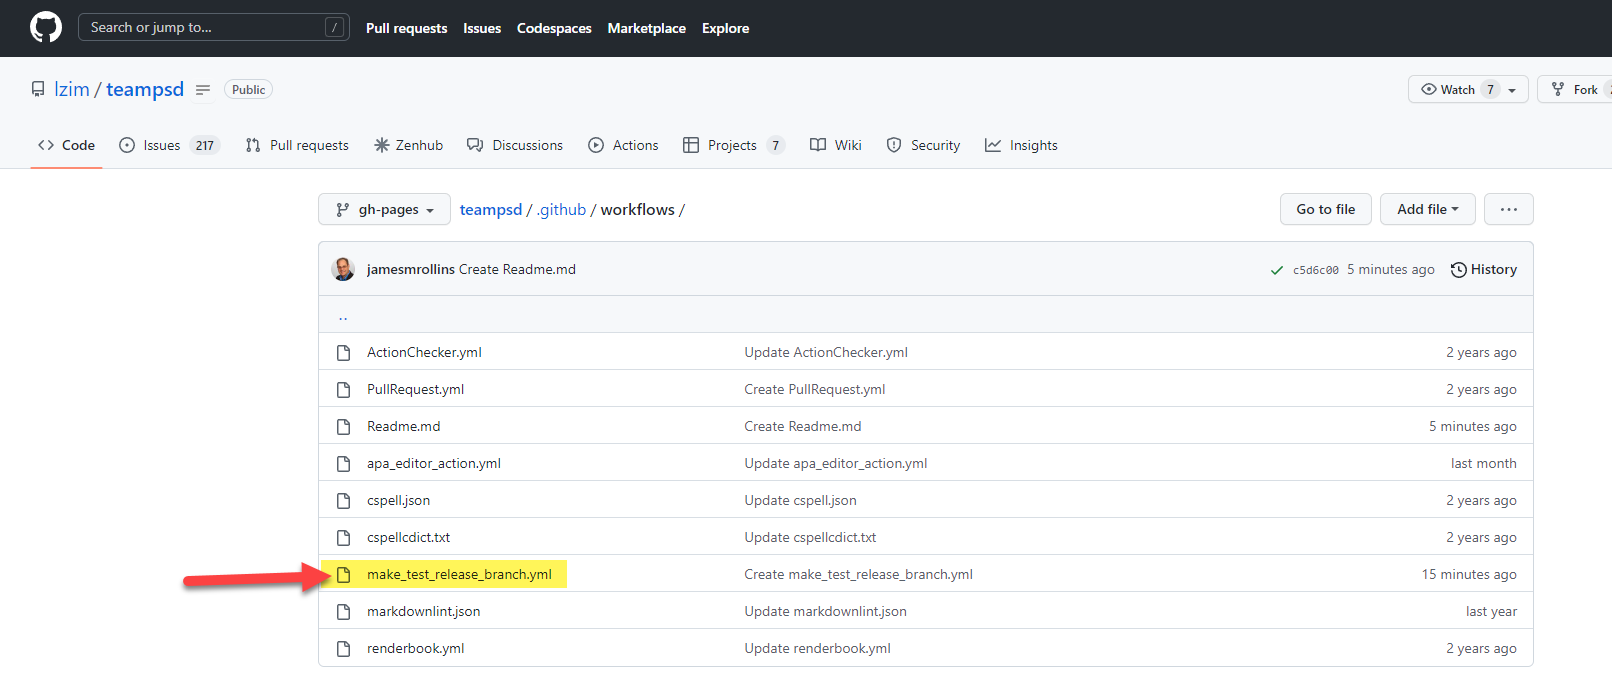
- Open make_test_release_branch.yml file.
- Make the modifications shown below.
- Enter the name of the previous model folder. This tells the action where to look for the present models.
- Enter the name of the next version model folder. This tells the action what the new model version folder name is going to be.
- Enter the name of the new release. This will tell the action what to name the new release folder for all the training materials.
- The FindReplace string will find all instances of the words or strings after “find” and replace with the word or string immediately following “replace.” This string is unlimited and can find as many characters, words or strings as desired.
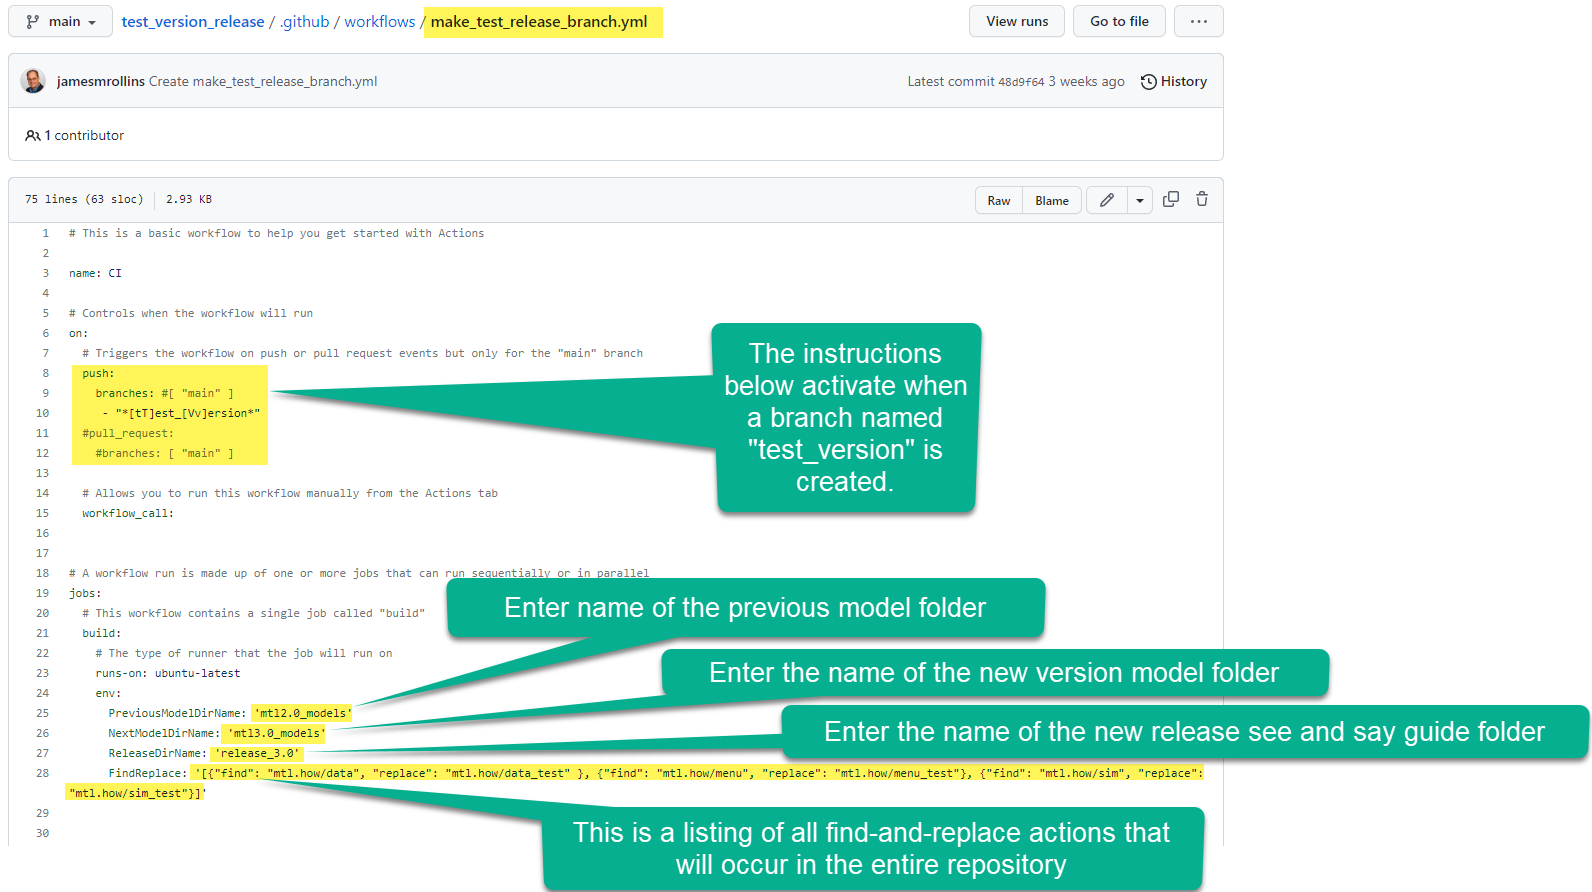
- When the test_version_release.yml file instructions are updated, commit the changes.
- Navigate back to the branch navigation button.
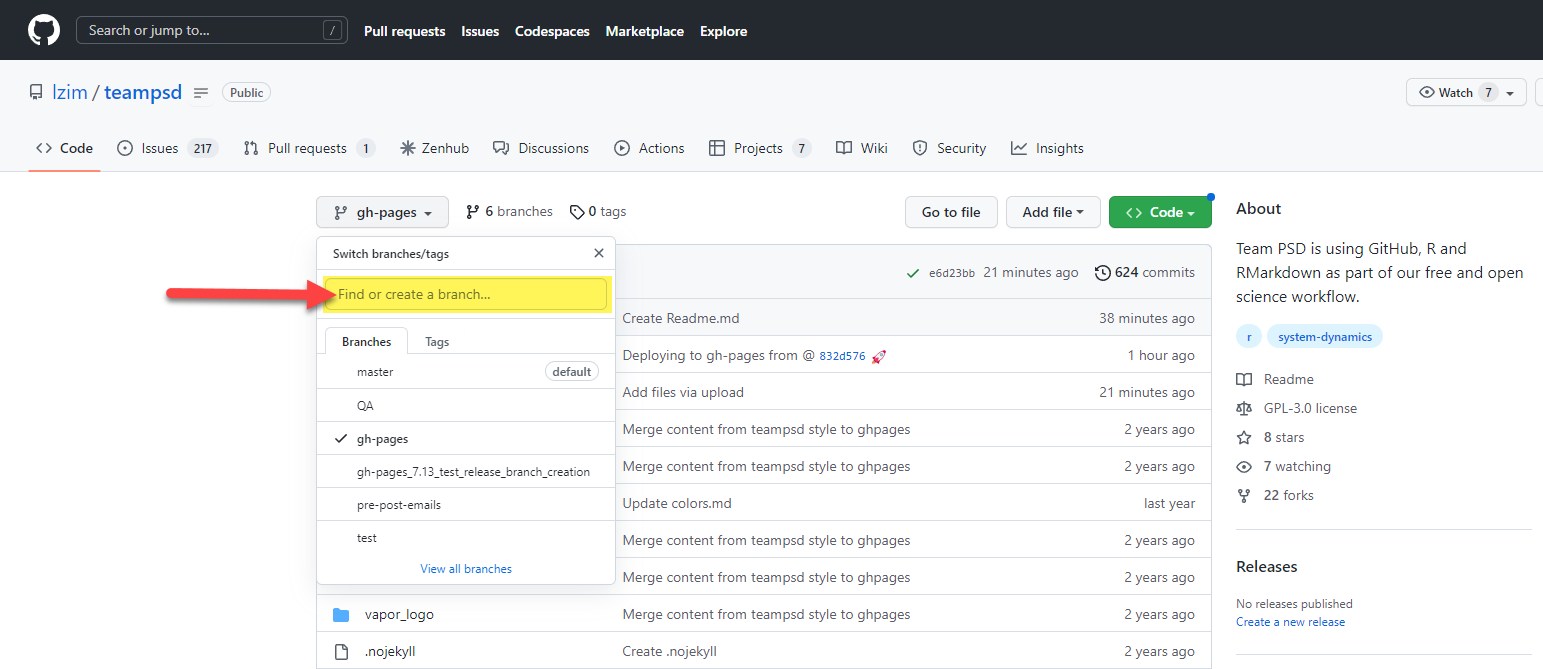
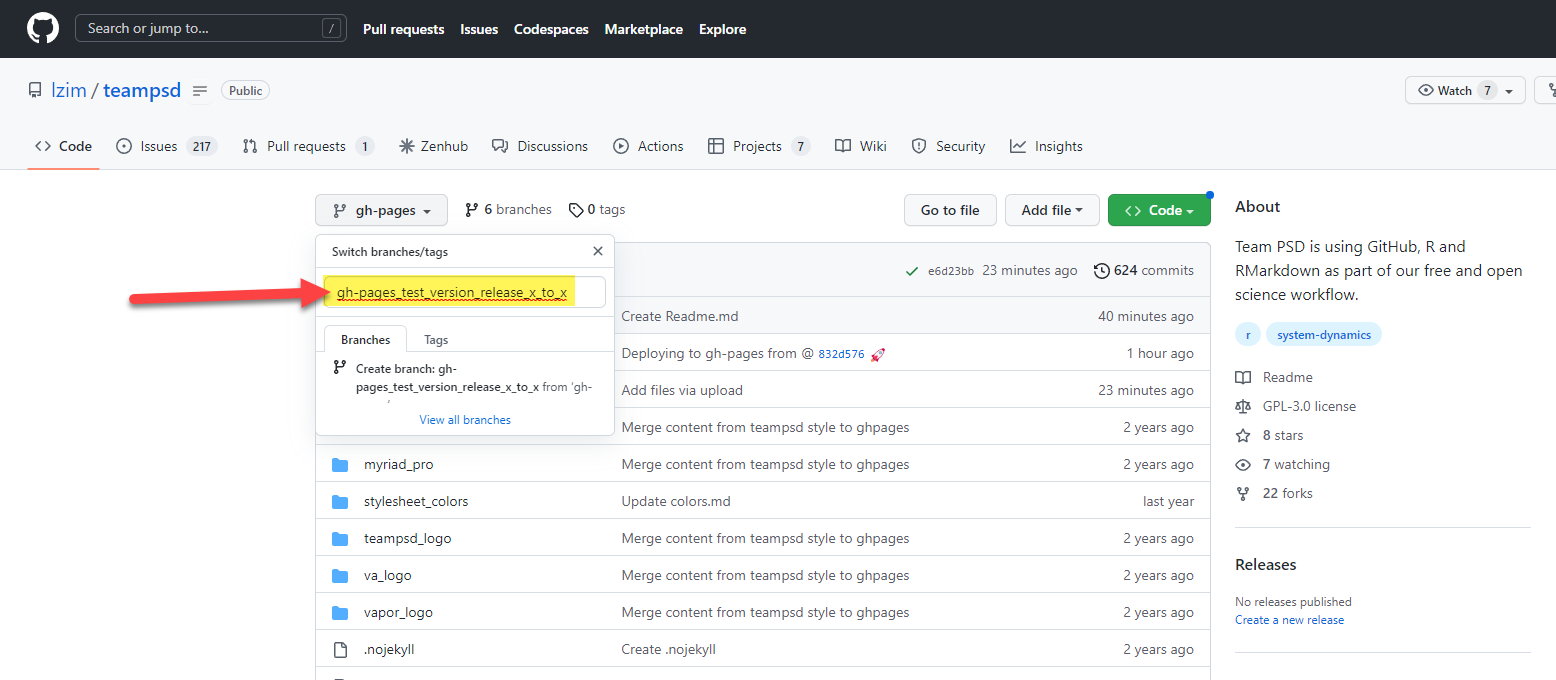
- Type in the new version test release branch name and press enter. The action should fire when the new branch is created. This can be monitored by clicking on the Actions tab.
- type in “gh-pages_test_version_release_x_to_x”
- the “test_version” in the name will trigger the action.
- “x_x” indicates the current release and the future release.